It’s a problem that affects Windows and Mac users alike: your cursor suddenly gets stuck. No matter what you do, the cursor doesn’t register any sort of input. You may also experience some strange behavior on your computer.
Files dragging across the screen or text getting randomly highlighted are two other examples. MacBooks do sometimes have a penchant for getting stuck whether it’s the cursor or on the login screen.
What causes cursors to get stuck in Highlight mode?
When a cursor gets stuck in Highlight mode, meaning it’s frozen, it can be attributed to a variety of reasons. Most of the time, it’s hardware related.
- Some kind of electronic problem – Something inside is faulty or something is wrong with the trackpad. Similar to instances on Windows laptops, you have to install some drivers or troubleshoot your Mac.
- Defective mouse or external trackpad – Consider such options as well before assuming that the issue is software related.
- Dirty MacBook – This can also cause connectivity problems, so refer to the preparatory steps below in that regard.
- Battery issues can be a culprit – If the MacBook is running on the lowest amount of battery possible, it may behave rather funny. We recommend checking out our guide on MacBooks getting stuck on one percent battery.
- Compatibility issues between your computer and OS – If you’re running Windows 10 on your Mac, this is clearly an option to consider.
- Problematic software – Yes, software could be getting in the way. This can be a lot of things from corrupted files to misconfigured settings.
What can I do to fix my cursor stuck in Highlight mode?
There are several things that you can do right off the bat:
- Restart your computer, as this is the tried and true method of fixing any problem on a MacBook. There could be something wrong with the software.
- If you’re using an external computer mouse and not the trackpad, simply swap it with another one.
- Over time, a MacBook’s trackpad can get clogged with dirt so it’s important to keep your computer clean. Turn off your computer, unplug it from its power adapter, and wipe it down with a microfiber cloth as per Apple’s instructions.
- Take in your MacBook for service. When all else fails, have Apple or an accredited store take a look. It’s strongly recommended that you check out Apple’s Mac Repair & Service page.
1. Reset SMC
- To reset the System Management Controller (SMC), you first need to find out if your MacBook has a T2 security chip or not. Apple has a page on its website listing all the Mac models that have the chip.
- Turn off your MacBook.
- If your machine has the T2 chip, press and hold the Control key and the Option key on the left side of your keyboard, as well as the Shift key on the right side for seven seconds.
- Next, press and hold the Power button for seven seconds along with the three other keys. Your MacBook may turn on. Don’t worry as it’ll soon turn off by itself.

- Hold all four keys for an additional seven seconds. After the time has passed, let go and turn your MacBook back on.
- If your MacBook doesn’t have the T2 chip, press and hold the Shift, Control, and Option keys on the left side of the keyboard.
- Then hold the Power button.

- Hold all the keys for 10 seconds. Release them after the time has passed, then turn on your MacBook.
2. Force quit apps
- Click the Apple logo and select Force Quit. Conversely, you can press the Option, Command, and Esc keys on your keyboard.

- Select the offending app and click the Force Quit button.

3. Adjust mouse settings
- Go back to the Apple logo menu and select System Preferences.

- In the new window, click Accessibility.

- Scroll down to the Motor section and click Pointer Control.

- Make sure that the box next to Ignore built-in trackpad when mouse or wireless trackpad is present is checked off.
4. Reset NVRAM
- Start by shutting off your MacBook.
- Reboot it and immediately press and hold the Command, Option, P, and R keys on your keyboard for 20 seconds.
- After 20 seconds, release the keys and let your Macbook finish restarting. You may see the Apple logo and hear the startup sound multiple times.
- Go into the system settings as they may have been reset during the reboot, according to Apple’s support page.
Be aware on newer MacBooks, it’s called PRAM (Parameter Random Access Memory). Older models will list it as NVRAM (Non-volatile Random Access Memory). They’re basically the same.
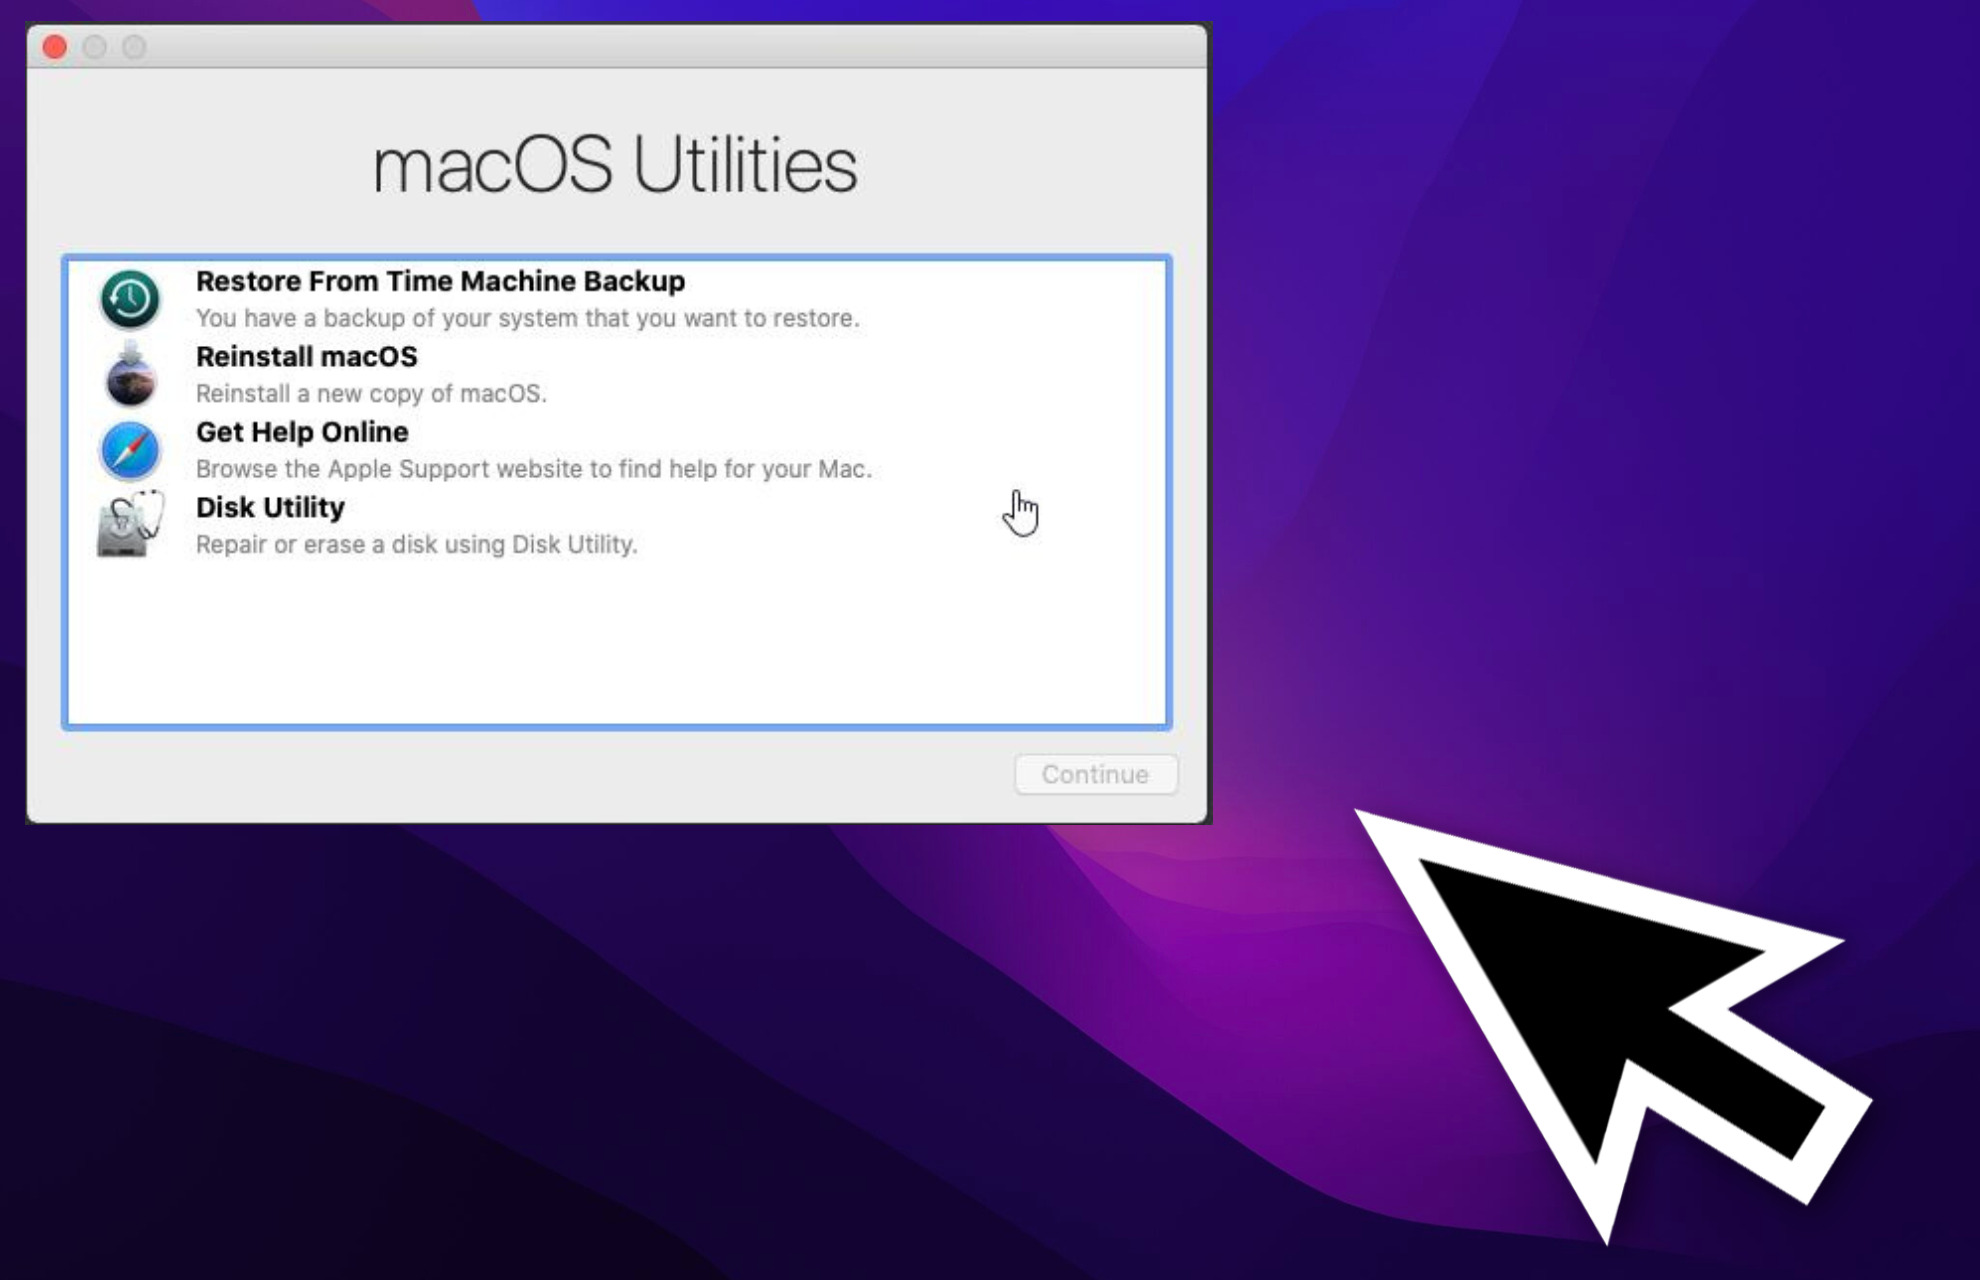
5. Reinstall macOS
- You will first need to open Disk Utility on your MacBook.
- If your MacBook has an Apple CPU, restart your computer, press and hold the Power button to see Startup Options, click the gear icon, and then Continue.
- If your MacBook has an Intel CPU, reboot your computer, press and hold the Command and R keys at the same time until you see the Apple logo appear.
- Under macOS Utilities, select Reinstall macOS, then the Continue button when it appears.

- From here, simply follow the installation wizard to reinstall your macOS from scratch.

There most certainly are other fixes that you should be aware of. The last solution requires you to open Disk Utility which is only possible by launching your MacBook in Recovery Mode. Suffice it to say, it’s possible to get stuck in Recovery Mode.
When this happens, you may have to reset the NVRAM like earlier but also potentially repair the startup disk.
Other people have complained of HDMI ports not functioning on their MacBook M1 machine. It could be that the HDMI cable simply wasn’t plugged in correctly, but also you may have to factory reset the sink device like a TV.
Feel free to comment below if you have any questions regarding these steps. Also, do not hesitate to comment about guides you’d like to see or information relating to MacBooks.