Organizing your files on any computer, let alone a Mac, is an important part of general upkeep.
Say you do this and your organizing is suddenly stopped by an error message that reads Error code: -43. Mac computers have several errors, like the 500 Error, that appear, so what does this one mean?
What is Error Code 43 on my Mac?
Error code 43 typically happens when you try to move a file or delete one from the trash bin. It means that, for whatever reason, your Mac cannot locate the file in question. It’s missing, thereby your computer cannot complete the action. There are several reasons why this occurs.
- There’s something wrong with the file name – Special characters like @, !, and $ in the file names have been known to cause Error Code 43.
- The file might be in use by another app – This is a common error while trying to edit or run a file.
- There’s a problem with the hard drive. This can affect both internal and external drives. If it’s the latter, be sure to check out the guide on fixing external drives.
- The file hasn’t been fully downloaded to the computer – If you don’t have the complete file yet, you may not use it, hence the Error Code 43.
- Files could have been deleted – If this happened to you, be sure to check out this guide on how to recover recently deleted files.
- The file in question could be locked – If the file is locked for editing, the system can’t access it without the right permissions.
Now that we know why Error Code 43 occurs on your Mac, let’s start troubleshooting and fixing the problem.
How do I fix Error Code 43 on Mac?
Before going into the main solutions, there are a few things that you can do right off the bat.
- Change the file’s name – Make sure that the name doesn’t have any special characters and sticks to letters and numbers.
- Make sure the file has been fully downloaded – If you’re just downloading the file, wait for the process to be completed.
- Make sure no other apps are using that file – Close all the apps that might be using the file in question.
- Restart your computer – That’s always a tried and true method. Sometimes errors arise when trying to restart a Mac. Fortunately, Apple has a set of instructions on its website on what you can do when this happens.
- Update your macOS – If your machine runs on macOS High Sierra, upgrading to macOS Catalina may be a little tricky. You’ll have to go to the macOS support page.
If you went through all these preliminary steps, let’s see how we can fix the problem by using the solutions below.
1. Check for locked files
- Open the Finder app, which is the smiling face on the bottom bar, and locate the problematic file in question.
- Right-click the file and click Get Info.

- See if there’s a checkmark next to Locked. If there is, click it to unlock the file.

If the problem arises when you copy the files, you can access our guide on what to do if your Mac is stuck while copying files and get more solutions.
2. Remove locked files from the trash
- Open the Finder app and click on Applications on the left-hand side.

- Scroll down and click Utilities.

- Now, select Terminal.

- In Terminal, enter the following command:
chflags -R nouchg.
- After the command, open the Trash app and drag the locked file(s) to the Terminal window. The file’s path will appear in Terminal. Press Enter on your keyboard. This can unlock files allowing you to delete them permanently.

If the process freezes, check our guide on what to do if Mac is stuck while emptying Trash and get more information.
3. Use Terminal to remove files
- Start by opening the Terminal app.
- Enter the following command and leave a space after it:
rm
- Like in the previous solutions, drag and drop the problematic file causing Error Code 43 into Terminal and hit Enter on your keyboard.

- All the problematic files will be deleted.
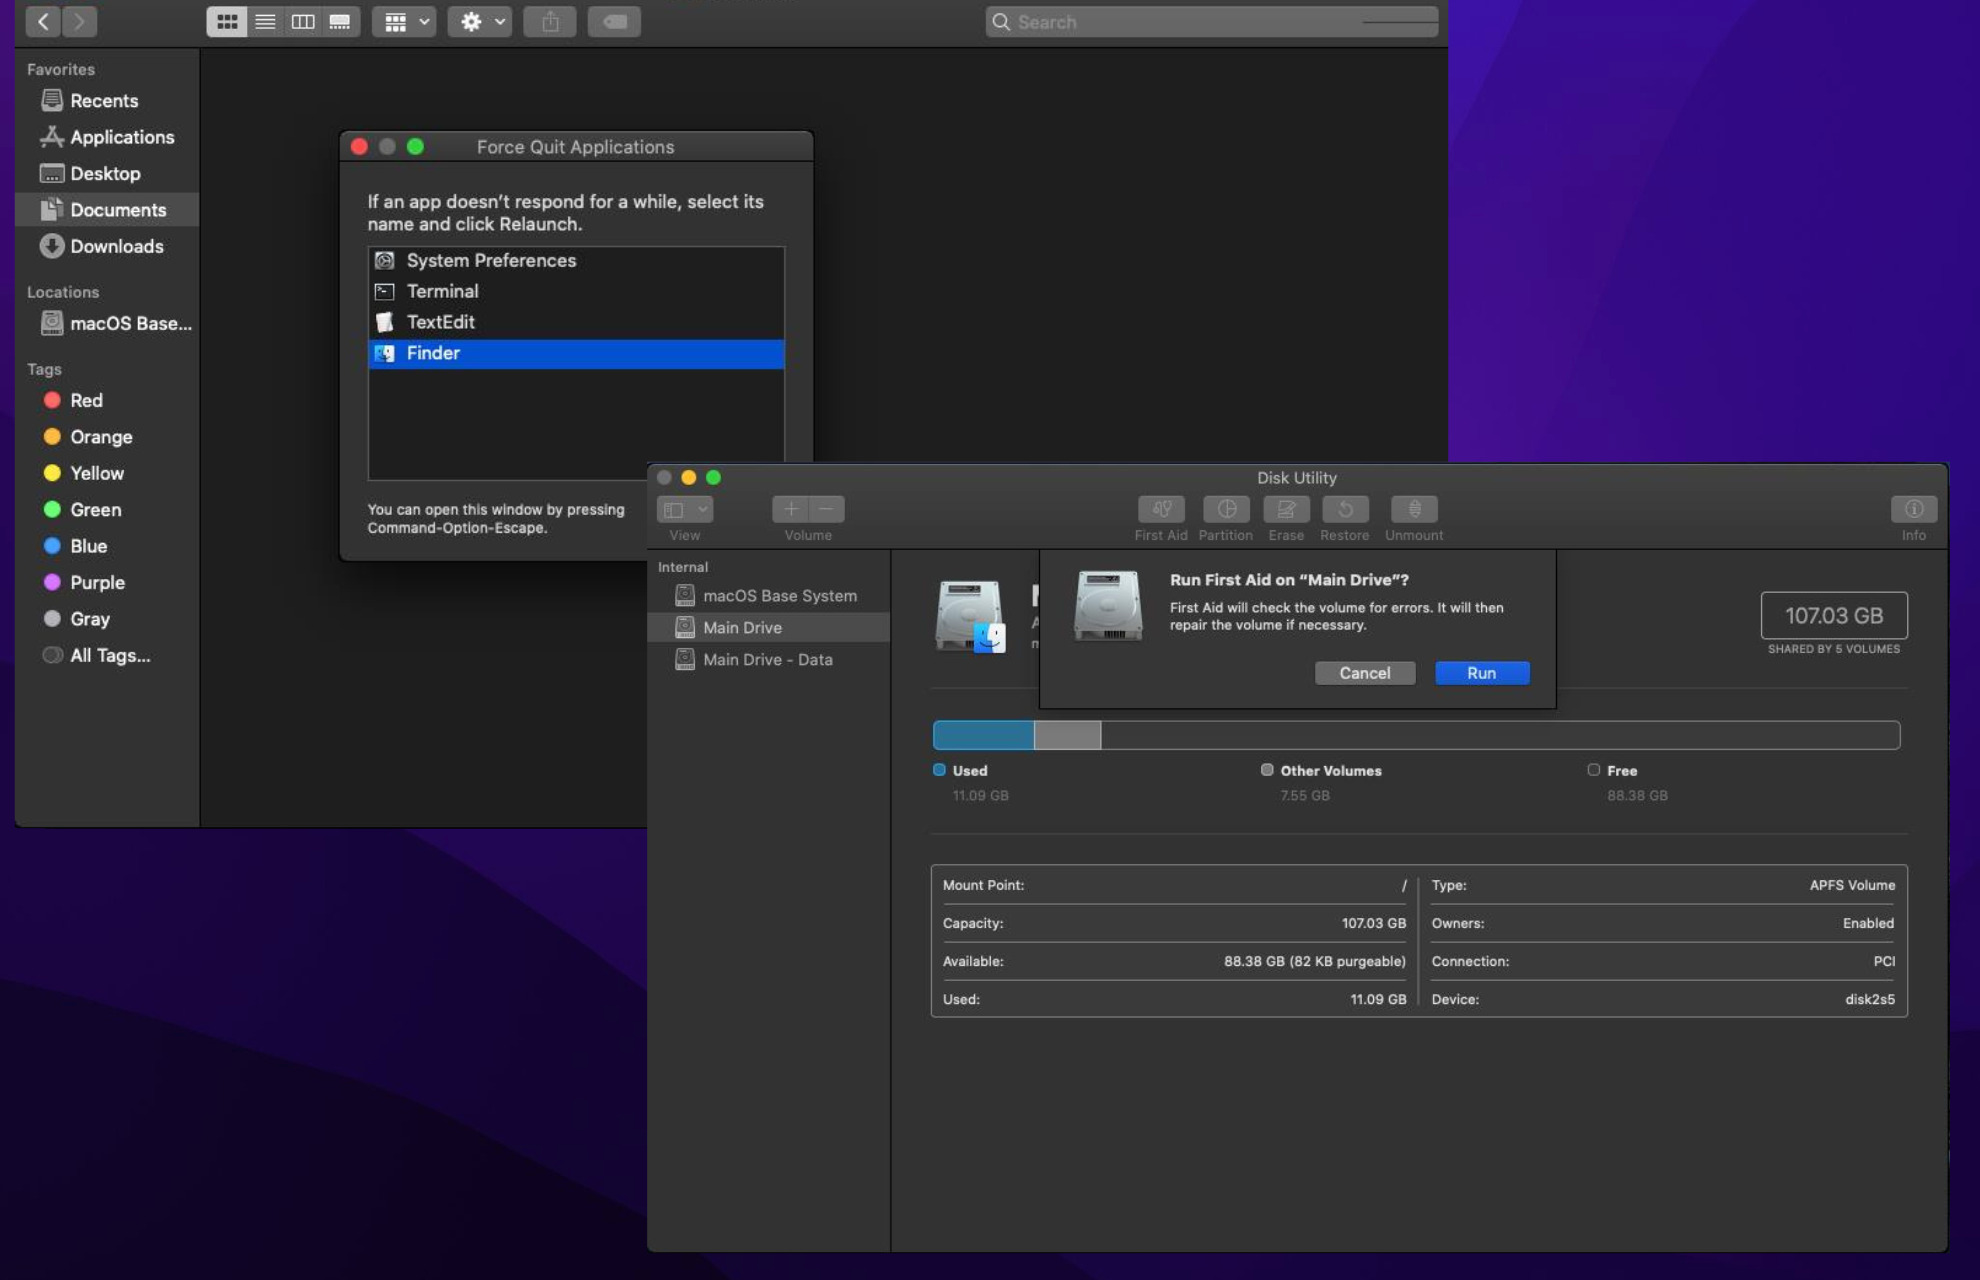
4. Run First Aid in Disk Utility
- Open the Finder app and click Applications on the left-hand side.
- Click Utilities, and in the following window, select Disk Utility.

- In Disk Utility, highlight the hard drive with the problematic files and click First Aid at the top of the window.

- Click Run when the prompt appears. Be aware that running First Aid may take several minutes or hours, depending on how many files it needs to scan.

- When it’s finished, you can click Show Details to get more info. Then select the Done button to finish.

5. Reset the PRAM or NVRAM on Mac
- Start by shutting off your Mac computer.
- Restart the machine and as soon as it begins rebooting, press and hold the Command, Option, P, and R keys on your keyboard at the same time for 20 seconds.
- When you hear the startup sound chime three times, that means both the PRAM and NVRAM have been reset. Some Macs will chime only twice. If that happens, don’t worry as it all still resets.
PRAM stands for Parameter Random Access Memory and it’s the part of the computer memory that stores important settings information about your Mac.
PRAM is seen more often on older Mac models. For modern machines, it’s NVRAM or Non-volatile Random Access Memory, but it serves the same purpose.
6. Force quit Finder
- If the Finder app is frozen, click the Apple logo to make the context menu appear.
- Select Force Quit.

- Highlight Finder and select the Relaunch button.

7. Boot into Safe Mode
- Restart your computer and as the Mac is rebooting, press and hold the Shift key.
- Doing this will reboot your computer in Safe Boot. You’ll know you’ve done it correctly when the words Safe Boot appear in the upper right-hand corner of the screen in red letters.

- Now, delete the problematic files. After you’re done, restart your computer to leave Safe Mode.
Mac users may encounter Error Code 5003 when trying to enter a Zoom meeting. This error prevents you from connecting to said Zoom meeting and it’s caused by an unstable internet connection or a strict Firewall.
We should also mention the volume hash mismatch error on Mac too. This can cause your computer to randomly crash and then reboot. Be sure to read our guide on how to fix this debilitating error. You may have to reset the SMC settings.
Feel free to comment below if you have any questions regarding these steps. Also, do not hesitate to comment about guides you’d like to see or information related to macOS Catalina.