You may use a MacBook on your lap just as much as you may at a desk. Therefore, you should be able to charge your MacBook battery to use it as a portable computer.
Unfortunately, some MacBook users’ menu bars show Not Charging when a device is plugged in. This happens even if the MacBook is powered by the power cable and shows a lightning bolt on the battery icon.
Why is my Mac Air M2 plugged in but not charging?
There are several potential causes for this. Some of them are:
- Maybe you are using a low-power adapter
- Your battery needs to be replaced
- Your OS needs to be updated
- Your MagSafe connector is damaged
- A setting in your System Preferences is not allowing your Mac to charge
Now you know the reasons why your Mac Air M2 is not charging. So, let’s move to the solutions that how you can fix these issues and make your MacBook Air M2 charge again.
How do you force a MacBook Air M2 to charge?
1. Check your power adapter
- Click on Apple icon and select About This Mac.

- Click on System Report.

- Click on Power in the sidebar of your window.

- Scroll down and you will see the charger information under AC Charger Information.

The wattage of the power adapter should match the wattage listed on the line. You need to buy a new power adapter if it doesn’t match.
2. Update your Mac OS
- Click on the Apple icon and select About This Mac.

- Click on Software Update.

- Click on Update to update your OS.

Once you update your Mac OS, restart your MacBook Air M2 and check if it’s charging or not. If the battery is still not charging, then follow the next solution.
3. Turn off optimized battery charging
- Click on the Apple icon and select System Preferences.

- Locate and click on Battery.

- Then, click on Battery in the left menu bar.

- Turn off the Optimized battery charging.

Sometimes this feature becomes a hurdle in charging your Mac, so to continue charging, simply turn off this function and you are good to go.
4. Check for debris in the MagSafe connector
Sometimes, dust or other small particles can accumulate in the MagSafe connector and prevent the connection from being made properly.
To clean the MagSafe connector, disconnect the power adapter from your MacBook Air and use a toothpick or paperclip to remove debris.
After you have cleaned the MagSafe connector, try reconnecting the power adapter to your MacBook Air and see if it charges or not.
5. Reset your NVRAM
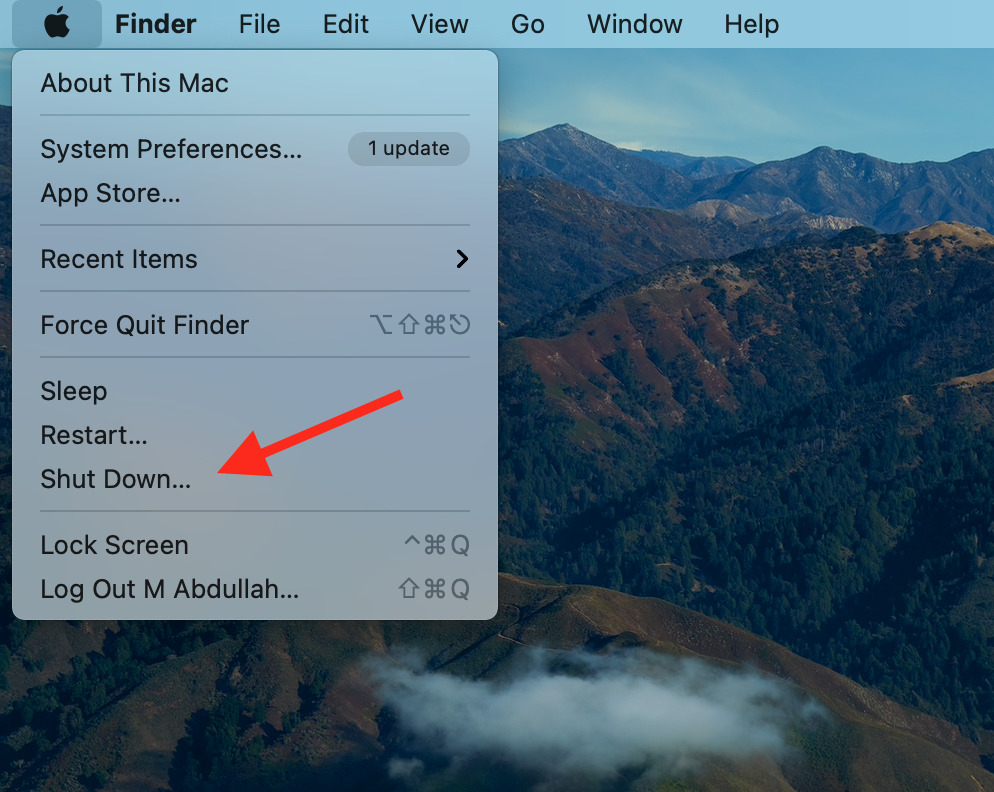
- Click on the Apple icon and select Shut Down.

- Power on the laptop and hold down Command + Option + P + R as soon as it begins to power up.
- You will need to hold down the keys for about 20 seconds. Let your Mac continue to start normally after you’ve held it for 20 seconds.
Now you have successfully reset your NVRAM and we hope your issues are resolved now.
6. Let your Mac cool down for a while
When watching a 4K movie or rendering graphics, the MacBook Air will heat up. Whenever your MacBook Air feels warm, avoid using it. In high-temperature situations, let the MacBook Air cool down and refrain from stressing the system.
Because if your mac is overheated, then the battery won’t charge. So, turn off your mac and let it cool down for a while. Then, connect the power adapter to your mac and check whether it charges.
7. Check your battery cycle count
- Click on the Apple icon and select About This Mac.

- Then, click on System Report.

- Click on Power to open up battery information.

- Then, under Battery Information label, you will see the battery Cycle Count.

Every MacBook Air and MacBook Pro model has a charge cycle count. It is basically how many times you can charge the battery of that particular system.
If the cycle count is near to or more than 1000, then there is a possibility that your battery needs to be replaced.
How do you reset the SMC on a MacBook Air M2?
- Click on the Apple icon in the top left corner of your screen.

- Select Shut Down from the menu.

- Press Shift + Control + Option and press the Power button for 10 seconds after the system is properly shut down.
- After you have released all the buttons, press the Power button to turn your MacBook on. You have now reset your SMC.
We hope that your problem is solved by now, and if it’s not, then the last thing you can do is take your MacBook Air to the Apple Store or an authorized service provider.
When you take your MacBook Air to the Apple store, they will check the health of your battery, and if it needs to be replaced, they will do it for you.
If you have any further queries, feel free to ask in the comments section below.

