With a device as popular as Apple’s iPad, there are bound to be companies to capitalize on by creating accessories for it, just like the Watch 8. And these things aren’t just whittled down to basic charging cables and cases either.
You can connect headphones, drawing pens, Bluetooth mice, keyboards, power banks, and adapters just to name a few. There are so many options to choose from on the iPad.
But sometimes you’ll run into an error message that states your accessory isn’t supported. While rare, errors do happen on Apple devices and they can be quite annoying.
Why did I get the Accessory Not Supported error?
Interestingly enough, Apple itself lists several reasons why this error appears on its website. According to the company, the most likely reason is that your accessory is either defective, damaged, or not officially certified by Apple.

The company also states that perhaps the accessory isn’t supported by the iPad. And it’s entirely possible the ports on the iPad are filled with grime preventing accessories from working.
This guide will list five different ways that you can try to get over the Not Supported error message. Something you will notice is that the solutions here bare a resemblance to our other guide concerning charging problems on the iPad.
By the end of this guide, you will become very familiar with some basic, also important, aspects of an iPad.
How to fix the Accessory Not Supported Error
1. Restart your iPad
Note: It’s possible that a software glitch may be the cause of the accessory error, so we recommend restarting the iPad.
- Press and hold the top button until the Power Off slider appears.

- Drag the slider to turn it off, then turn it back on by pressing and holding the same button.
Certain iPad models have a Home button while others don’t. It really doesn’t matter which one you have as you can always press the top button to turn off and on an iPad.
Although we should also mention that if your iPad doesn’t have a Home button, you can also use the volume button instead.
2. Check iPad connections and clean ports
- First, disconnect and reconnect the accessory. Sometimes plugging an accessory in and out causes the problem.
- If the problem isn’t solved, check the ports around the iPad and see if they’re dirty. If they are, clean them.
- Start by turning off the iPad by pressing and holding the top button (also known as the Sleep/Wake button). Then move the slider when it appears onscreen.
- Do not, under any circumstances, use cleaners, water, compressed air, sprays of any kind, ammonia, or solvents. These will ruin the iPad.
- Using a lint-free cloth (here’s an example), gently wipe down the device and any Lightning port cables.
- Grab a soft toothbrush and gently brush the ports to scrape out any dirt.
- For the charging port, you can try using the toothbrush again or use a paperclip to gently scrape out the grime.

One of the best methods of fixing this problem is to check the ports on your iPad and make sure they’re clean. Dirty ports are a common reason why accessories don’t work on any Apple product; not just iPads.
3. Update iPadOS
- Open the Settings app as seen by the gear icon.

- Next, tap General on the left-hand menu.

- Select Software Update.

- Choose the software update that you want to download, then tap Download and Install (On some devices, it may be Install Now.)
- While you’re there, we recommend toggling Automatic Updates so your device will automatically download any and all changes.
- On some models, you may have to toggle Download iPadOS Updates. The sample image below shows iOS, but the process is still the same.

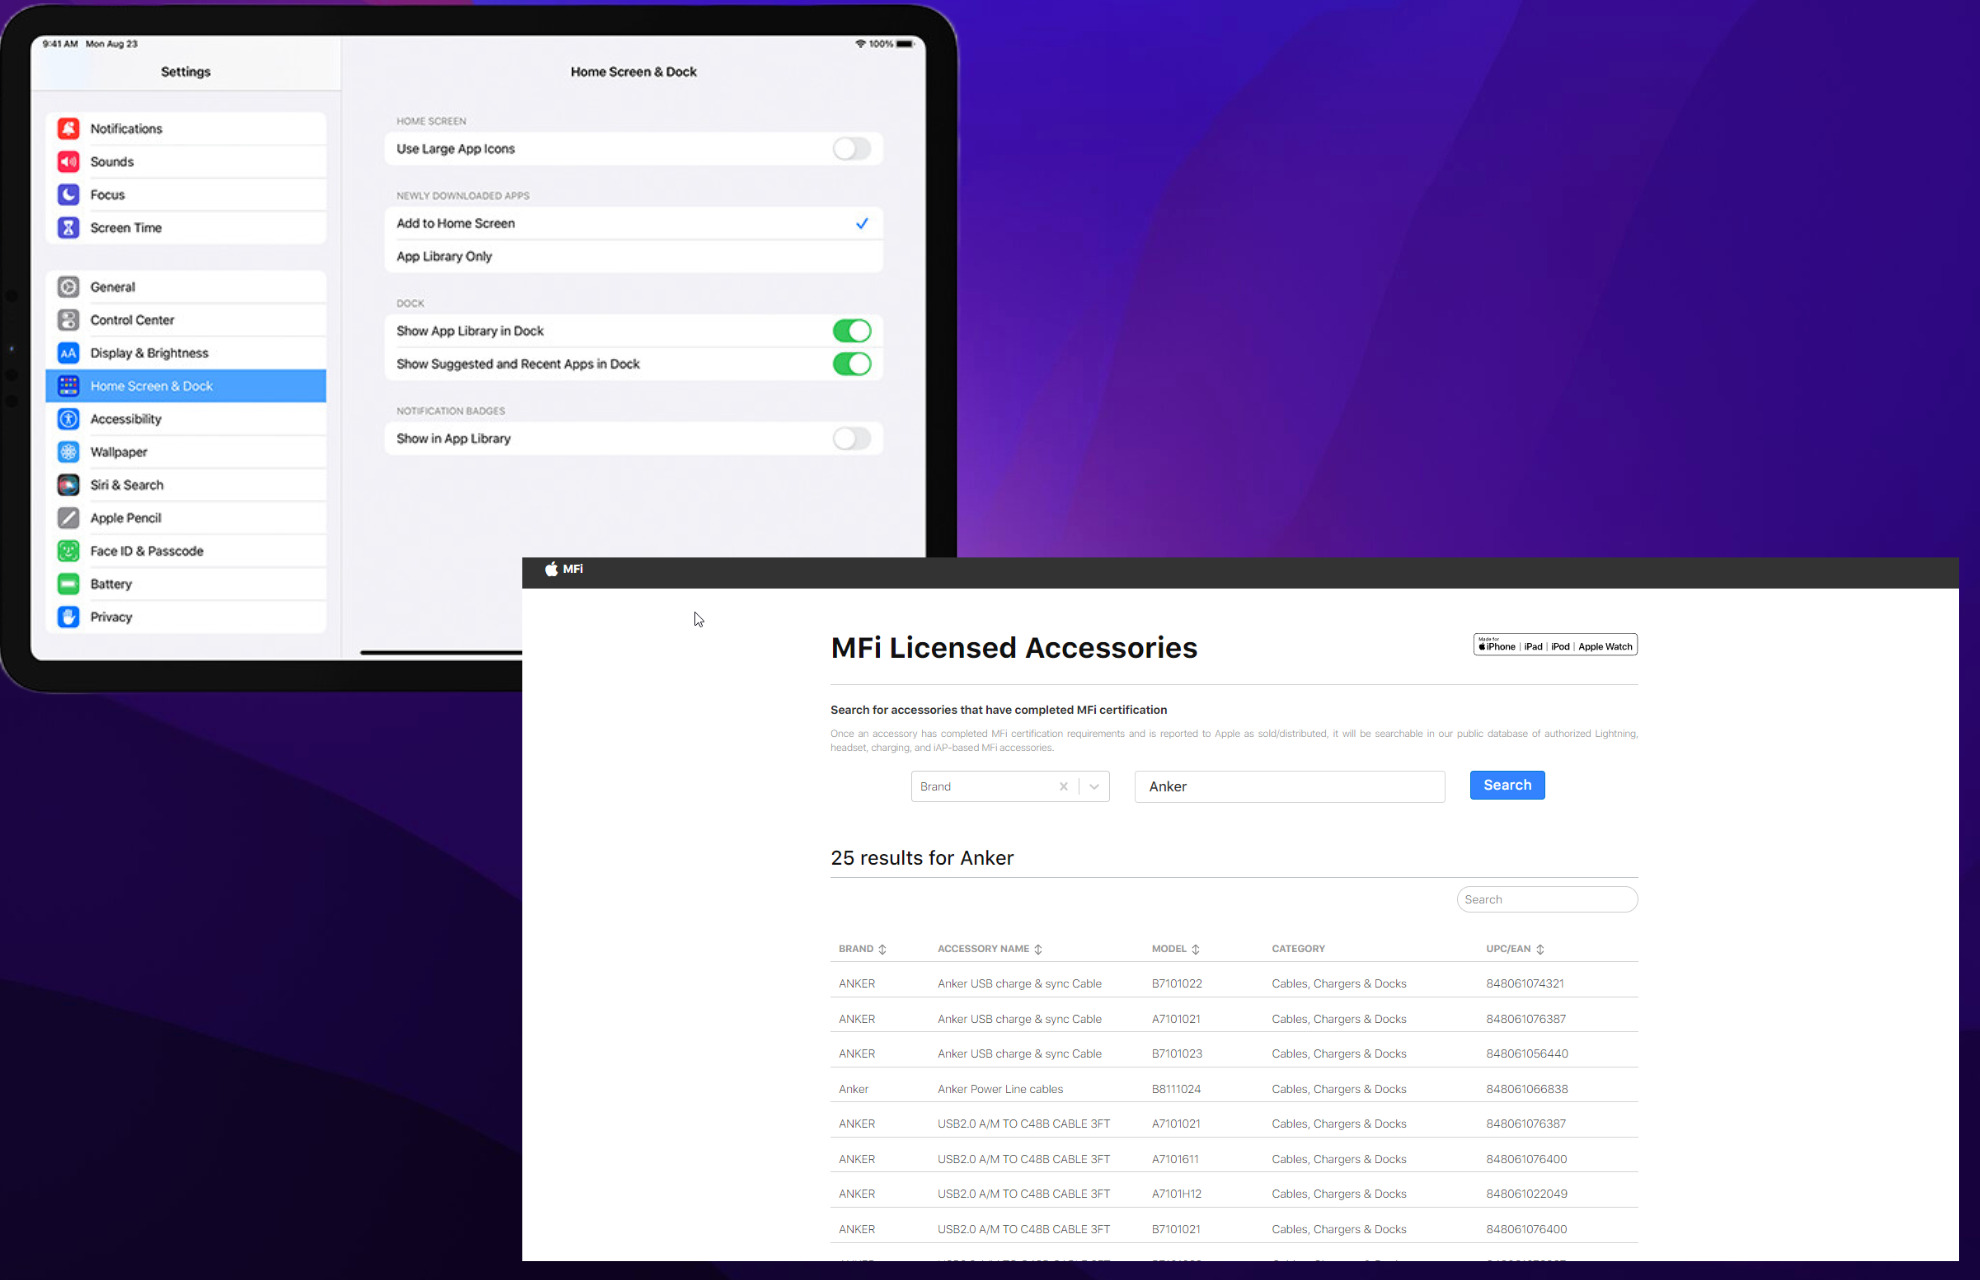
4. Check if your accessory is MFi certified
- Go to Apple’s MFi License Accessories page.
- Select how you can want to search the accessory; be it Model, Brand, or UPC/EAN. This guide will select Brand.

- Enter the brand of your accessory (for example, Anker) and click the Search button.
- A list of the approved accessories for that brand will appear below.

MF-certified means that Apple has deemed an accessory safe to use on its products; in this case, iPads. It is possible that you can use a non-MFi-certified accessory on your iPad and have it work just fine.
However, more often than not, those unapproved accessories will not work. Because of that, it’s highly recommended that you use a properly approved accessory.
5. Take your device in for repairs
- Go to Apple’s iPad Repair & Service page.
- Select Get service.

- On the new page, select the problem occurring with your iPad. This guide will select More.

- For example, this guide will select Keyboard indicating our iPad has a problem with a keyboard accessory. Ultimately, you will have to choose whichever suits you best.

- Now, we select Continue.

- Apple will give you a series of advice articles and the opportunity to contact its help center.

- Call them and talk to an agent who will advise on what to do. Maybe even get you an appointment with an Apple store or send a package so you can mail the device in for repairs.
If all else fails, you will need to take your iPad in for repairs at an Apple Store. It’s possible that your device has some kind of internal damage, something you will not be able to repair.
Recently, Apple has made strides to allow people to repair their devices, but iPads are not part of this support. Be aware that repairs outside of the AppleCare+ plan will run you several hundred dollars.
Are there other iPad fixes that I should know about?
Yes, there are definitely other noteworthy iPad fixes. For example, some people have complained about being unable to install the Google Chrome browser on their devices. Solutions for this are pretty simple.

You can try updating your iPadOS to the latest version available as well as clearing up some space in its storage. Your iPad could be full. There have also been instances of iPads not being recognized on Windows 11.
To solve that problem, you may have to turn on the Trust This Computer option or run a troubleshooter on the Windows 11 machine.
Feel free to comment below if you have any questions regarding these steps. Also, do not hesitate to comment about guides you’d like to see or information related to the iPad.