We’ve all struggled with storage space and most of the time, it’s our stored photos that take most of the space.
And when you also have duplicates of your media that you forgot about, your drives get full in no time.
Finding and deleting duplicate photos on your Mac is a daunting process but a tool called Duplicate Photo Fixer Pro makes it all a lot easier.
Below, we will highlight its best features and show you how the program actually works on your Mac.
How does Duplicate Photo Fixer Pro help you?
Well, as its name clearly suggests, it identifies duplicate photos on your drives so you can remove them quickly.
However, Duplicate Photo Fixer Pro is a lot more complex because it has filters for the matching level and it supports almost any image format.
It even looks at the metadata of the images to look for the geolocation of the photos.
What are the best features of Duplicate Photo Fixer Pro?
1. Fast scanning
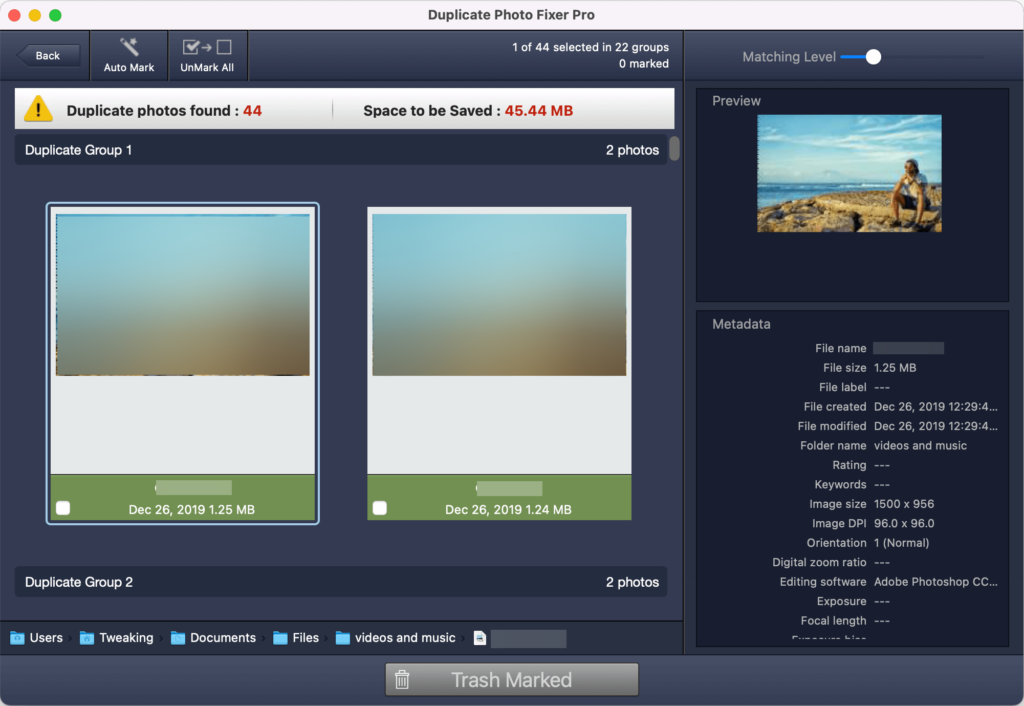
Duplicate Photo Fixer Pro is incredibly fast in identifying duplicate photos. In our tests, it ran through over 9000 images in just a few seconds by using the default settings.
By adjusting the filters to more strict criteria, or by scanning more folders, the timing will increase. Nevertheless, the results of our tests were impressive.
For instance, you can set up the Bitmap size that determines the sample area that the software analyzes on the images.
Of course, the bigger the size, the most accurate will be the results and the more time it will take.
You may also select the time interval on which the tool analyzes individual photos or the overall matching level.
2. Huge number of supported files
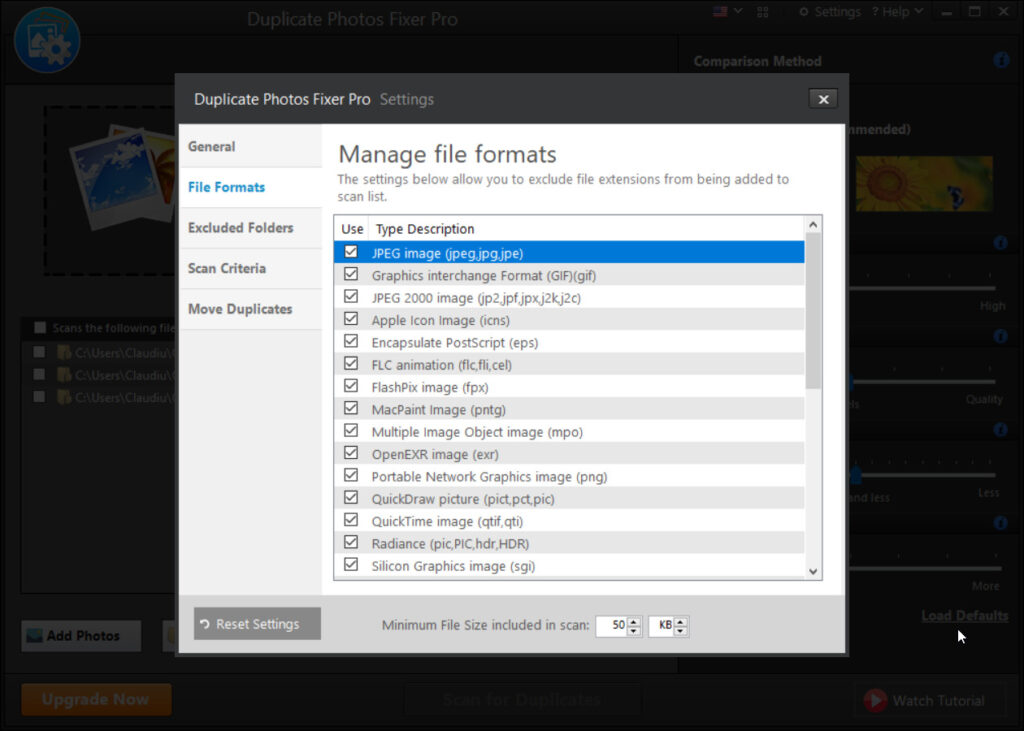
When you go into the Settings menu in Duplicate Photo Fixer Pro, you will be able to go into the File Formats tab and exclude the ones that you’re not interested in.
However, this way, we found out that the software is able to identify even the less used file types for some of the camera manufacturers like .raf from Fuji cameras, or .nef and .nrw from Nikon cameras.
In a few words, we haven’t seen any known image format that this tool can’t identify.
3. Sleek and friendly interface
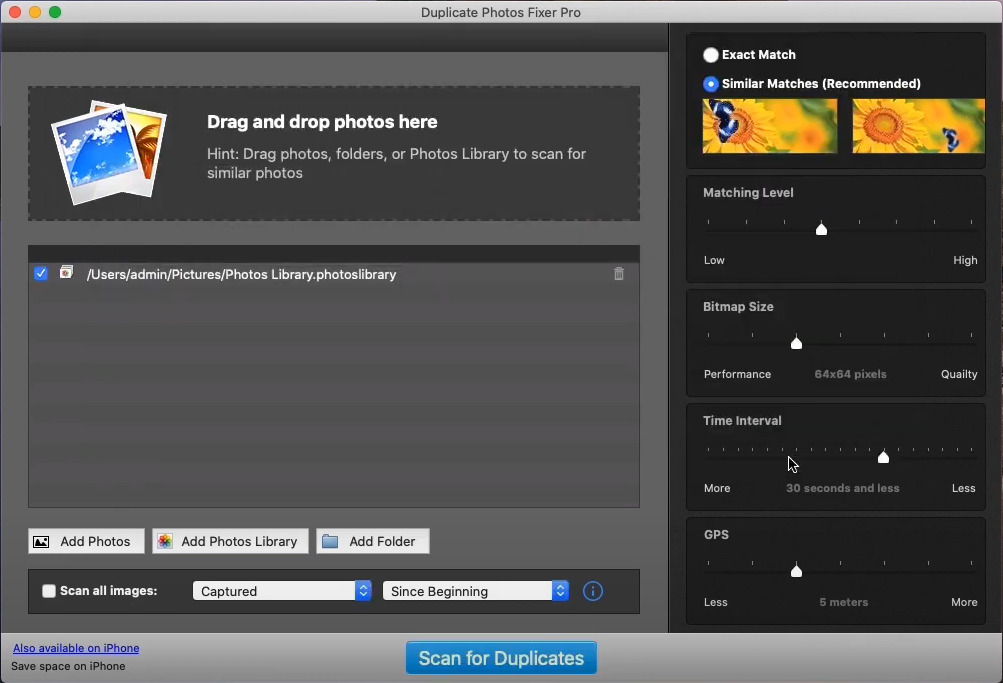
The Duplicate Photo Fixer Pro’s interface looks modern and it blends seamlessly into the Mac environment.
But the most important quality is the fact that all the functions and menus are self-explanatory and easy to use.
Just add the folders you want to scan, set the parameters from the right pane, and hit the Scan for Duplicates button.
In just a few seconds you will get your results and the option to delete all the duplicates with a single click.
How can I delete duplicates using Duplicate Photo Fixer Pro?
- Visit the Duplicate Photo Fixer website and hit the download button.

- This will take you to the App Store where you can download and install the app.
- After you install the app, launch it to find the main interface of the software.

- Now, you have many options on how to add photos. You can simply drag and drop them, or select one of the three buttons: Add Photos, Add Photo Library, or Add Folder. We went for Add Photos Library because it’s the most convenient.

- Select your photos library and click on the Add Photos Library button. You may add as many folders or libraries as you want

- Now, look at the right pane and select where you are looking for an Exact Match or a Similar Match.

- If you go for the first option, all the others below are deactivated for obvious reasons.
- Remaining on the Similar Match option, now, you can toggle the Matching Level, the Bitmap Size, the Time Interval, and the GPS.

- Finally, you click the Scan for Duplicates button and the app will start analyzing.

- In just a few seconds, you will get the report of duplicate files. If you click on the Auto Mark option and hit Continue, the tool will automatically select only the duplicates.
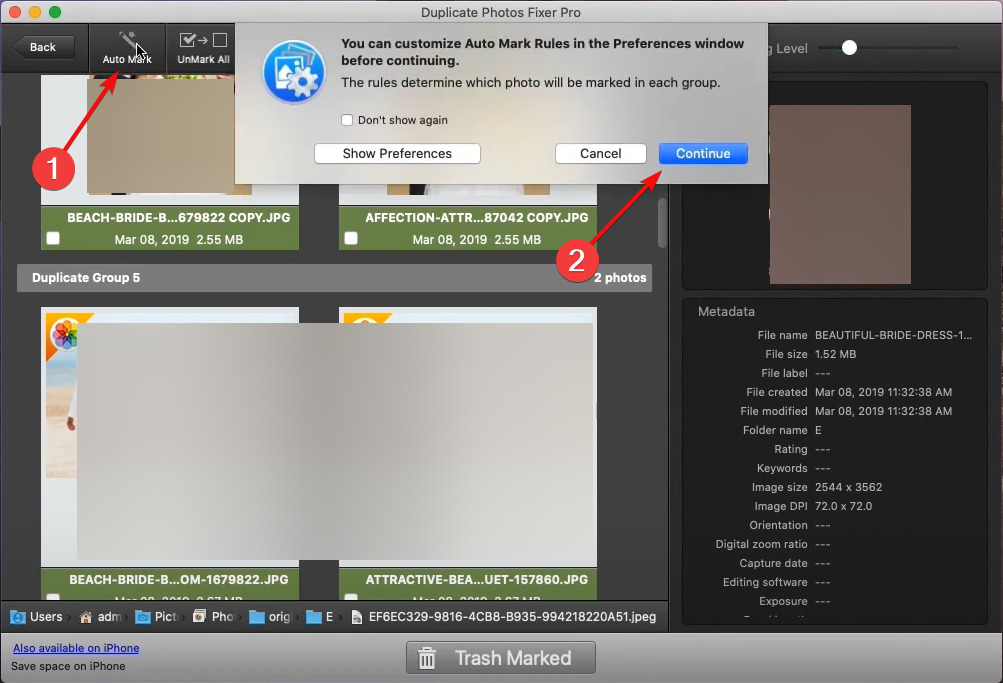
- Finally, click on Thrash Marked and confirm the action by selecting the Thrash Photos button.
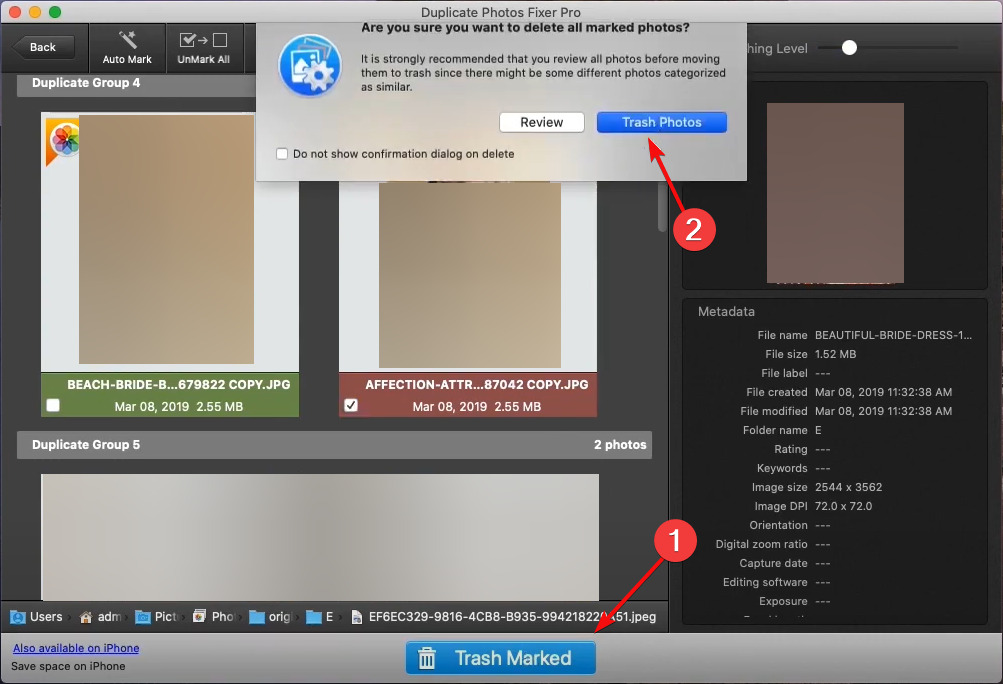
- On the next screen, you will see that the photos were not actually deleted so you can still recover them if you made any mistakes. Instead, they were moved into a Duplicate Marked Photos folder.

- To delete them completely, open the Photos app and find the Duplicate Marked Photos album, select the photos, press the CMD key, right-click the images and select the Delete option.
Although it looks like there’s a lot to do, there are only a few steps that are necessary. Duplicate Photo Fixer Pro’s default settings are pretty well adjusted for any duplicate deleting job.
Of course, if you go into its Settings menu, you will find more tweaking options. You may set alerts, exclude folders, change the scan criteria, and the default folder on where to move the duplicates.
But again, all the menus are self-explanatory and easy to comprehend so we’re sure you won’t encounter any issues.
How much do I pay for Duplicate Photo Fixer Pro?
First, you should know that Duplicate Photo Fixer has a free version for you to try but it’s limited to removing only 15 photos.
However, the Mac version is only $38.99 right now in the App Store. That’s a pretty low price for a lot of free space on your drive.
And we’ve said Mac version because there are also versions for Windows and iOS so you may use the tool on other devices as well.
⇒ Get Duplicate Photo Fixer Pro
| Pros | Cons |
| Simple and comprehensive user interface | Different licenses for Mac and Windows versions |
| Lightning-fast duplicate photo identification | |
| Compatible with Windows, macOS, and iOS devices | |
| Smart marking of duplicates for deletion | |
| You can tune the similarity level of the duplicates |
Conclusion
Duplicate Photo Fixer Pro is an excellent tool, ideal if you have a lot of libraries of photos on your drives.
The identification of duplicates is really top-notch and the advanced settings for matching level detection are very smart.
Not only it can help the average user, but also photographers who take photo bursts and want to filter and keep only the good images.
We hope that you found our review of Duplicate Photo Fixer compelling. If we didn’t convince you, you can still try the software for free on your Mac, PC, or iOS device.
If you’ve tried it already, share your experience in the comments section below because it may help other users.

